Part 2: Track a packet on the blockchain
The goal of Part 2 is to implement a simple application that tracks sensor measurements on the blockchain.
Therefore once the IoT application is started, it will immediately send an LightAlarmTransaction to the network, whenever the sensor detects light.
The following points below are covered in this section:
-
How to implement the
LightAlarmTransaction. -
How to register the new transaction type with the node application.
-
How to create the IoT script, and how to install it on the Raspberry Pi.
-
How to use the client app to initialize the packet account, and to track the alarm transactions in the network.
Project architecture
The three different kind of applications that need to be developed to create the decentralized supply chain system are listed below:
- A node application
-
This will accept the application specific transaction types. This application needs to be installed on different independent nodes, and will setup and maintain the blockchain which is used to store the data of the packets, carrier and users.
- A client application
-
This will display information from the blockchain to the user. A frontend is required which should be displaying a list of packetIDs. This should consist of the carrier, the sender, the recipient, and a status field, (
pending | ongoing | alarm | success | fail). In addition, it should also provide an easy way to create and send the different transaction types to the network. - An IoT application
-
This is stored on a microcontroller/raspberry Pi. This application will track that the packet is not manipulated during the delivery. In order to achieve this, certain sensors will be connected that track information, such as light, temperature and/or humidity inside of the packet. If something unexpected is detected by the IoT app, it will create a transaction object, sign it, and send it to the network.
The basic file structure can be seen below: (contents of lisk-sdk-examples/transport):
.
├── README.adoc
├── Workshop.adoc
├── client                                          (1)
│   ├── accounts.json
│   ├── app.js
│   ├── package.json
│   └── views/
├── iot                                             (2)
│   ├── README.md
│   ├── lisk_rpi_ldr_and_temperature_sensors_wiring.png
│   ├── light_alarm
│   │   ├── package.json
│   │   └── index.js
├── node                                            (3)
│   ├── index.js
│   └── package.json
└── transactions                                    (4)
    ├── finish-transport.js
    ├── light-alarm.js
    ├── register-packet.js
    └── start-transport.js
| 1 | Contains the code for the client application. |
| 2 | Contains the code for the IoT application. |
| 3 | Contains the code for the node application. |
| 4 | Contains the custom transactions, that are used by the node and client app. |
2.1 Implement the LightAlarm transaction
For a simple version of packet tracking only one custom transaction needs to be implemented, the LightAlarmTransaction.
This transaction will be sent by the IoT device inside of the packet when it detects anomalies with its connected photoresistor, (light detection).
In this next step only the validateAsset function needs to be implemented, validateAsset.
For more details please check the explanation below.
Implementation of the validateAsset() function can easily be achieved using the following code below:
/transactions/light-alarm.jsconst {
BaseTransaction,
TransactionError,
} = require('@liskhq/lisk-transactions');
/**
* Send light alarm transaction when the packet has been opened (accepts timestamp).
* Self-signed by packet.
* The `LightAlarmTransaction` is extended from the `BaseTransaction` interface.
*/
class LightAlarmTransaction extends BaseTransaction {
/* Static property that defines the transaction `type` (has to be unique in the network). */
static get TYPE () {
return 23;
}
/* Data from the packet account is cached from the databse. */
async prepare(store) {
await store.account.cache([
{
address: this.senderId,
}
]);
}
/* Static checks for presence and correct datatype of `timestamp`, which holds the timestamp of when the alarm was triggered. */
validateAsset() {
const errors = [];
/*
Implement your own logic here.
Static checks for presence of `timestamp` which holds the timestamp of when the alarm was triggered
*/
return errors;
}
async applyAsset(store) {
/* Insert the logic for applyAsset() here */
}
async undoAsset(store) {
const errors = [];
const packet = await store.account.get(this.senderPublicKey);
/* --- Revert packet status --- */
packet.asset.status = null;
packet.asset.alarms.light.pop();
const tmpAlarms = packet.asset.alarms;
packet.asset = {
status: null,
alarms : tmpAlarms
};
store.account.set(packet.address, packet);
return errors;
}
}
module.exports = LightAlarmTransaction;| Please see the custom transactions guide for an overview about the required methods for custom transactions. |
2.1.1 Task: Implement validateAsset()
Implement your own logic for the validateAsset() function here at line 31.
The code will validate the timestamp that has been sent by the LightAlarmTransaction.
In case an error is found, push a new TransactionError into the errors array and return it at the end of the function.
All data that is sent with the transaction is available through the this variable.
Therefore to access the timestamp of the transaction, use this.timestamp.
|
The code snippet below describes how to create an TransactionError object.
Try to add a fitting TransactionError to the errors list of validateAsset(), in the case whereby the timestamp is not present, or if it has the wrong format.
The expected data type for the timestamp is number!
|
TransactionError object is shown below:new TransactionError(
'Invalid "asset.hello" defined on transaction',
this.id,
'.asset.hello',
this.asset.hello,
'A string value no longer than 64 characters',
)
If further information is required regarding implementing the validateAsset() function, check out the other examples such as hello_world inside of the lisk-sdk-examples repository.
Alternatively, please see the custom transaction guide in the Lisk documentation.
|
To verify the implementation of validateAsset(), please compare it with the solution.
|
2.1.2 Task: Implement applyAsset()
The applyAsset function informs the blockchain which changes should be made and how a user’s account can be changed.
This holds the core business logic of your custom transactions.
An example showing the implementation of applyAsset for the LightAlarmTransaction can be seen below:
- TASK
-
Copy the code snippet below and replace the
applyAssetfunction inlight-alarm.js, in order to complete the implementation of the lightAlarmTransaction.
/*Inside of `applyAsset`, it is possible to utilize the cached data from the `prepare` function,
 * which is stored inside of the `store` parameter.*/
async applyAsset(store) {
    const errors = [];

    /* With `store.account.get(ADDRESS)` the account data of the packet account can be seen.
     * `this.senderId` is specified as an address, due to the fact that the light alarm is always signed and sent by the packet itself. */
    const packet = await store.account.get(this.senderId);

    /**
     * Update the Packet account:
     * - set packet status to "alarm"
     * - add current timestamp to light alarms list
     */
    const alarms = packet.asset.alarms ? packet.asset.alarms : {};
    alarms.light = packet.asset.alarms.light ? packet.asset.alarms.light : [];
    alarms.light.push(this.asset.timestamp);

    packet.asset = {
        ...packet.asset,
        status: 'alarm',
        alarms: alarms

    };

    store.account.set(packet.address, packet);

    /* Unlike in `validateAsset`, the `store` parameter is present here.
     * Therefore inside of `applyAsset` it is possible to make dynamic checks against the existing data in the database.
     *  As this is not required here, an empty `errors` array is returned at the end of the function. */
    return errors;
}
2.1.3 Register the transaction with the application
As a new custom transaction LightAlarmTransaction has been created, it needs to be registered with the node application.
Without this step the nodes will not have the logic to validate a LightAlarmTransaction, and hence the transaction will be discarded.
node/index.js which registers the LightAlarmTransaction to the blockchain application as shown below:const { Application, genesisBlockDevnet, configDevnet } = require('lisk-sdk');
const LightAlarmTransaction = require('../transactions/light-alarm'); (1)
configDevnet.label = 'lisk-transport';
const app = new Application(genesisBlockDevnet, configDevnet);
app.registerTransaction(LightAlarmTransaction); (2)
app
.run()
.then(() => app.logger.info('App started...'))
.catch(error => {
console.error('Faced error in application', error);
process.exit(1);
});| 1 | Requires the custom transaction. |
| 2 | Registers the custom transaction with the application. |
After the registration of a new transaction type, the node needs to be restarted to apply the changes with node index.js | npx bunyan -o short.
Ensure this command is executed inside the node/ folder.
|
2.2 The IoT application
In this step a script will be created that will run on the Raspberry Pi to track if the packet has been manipulated.
2.2.1 Connect to the Raspberry Pi
For simplifying the network topology for the workshop, a DHCP server was configured in the Raspberry Pi that will assign an IP address to your computer using a virtual ethernet via a USB port.
The Raspberry Pi will have the hostname raspberrypi.local by default.
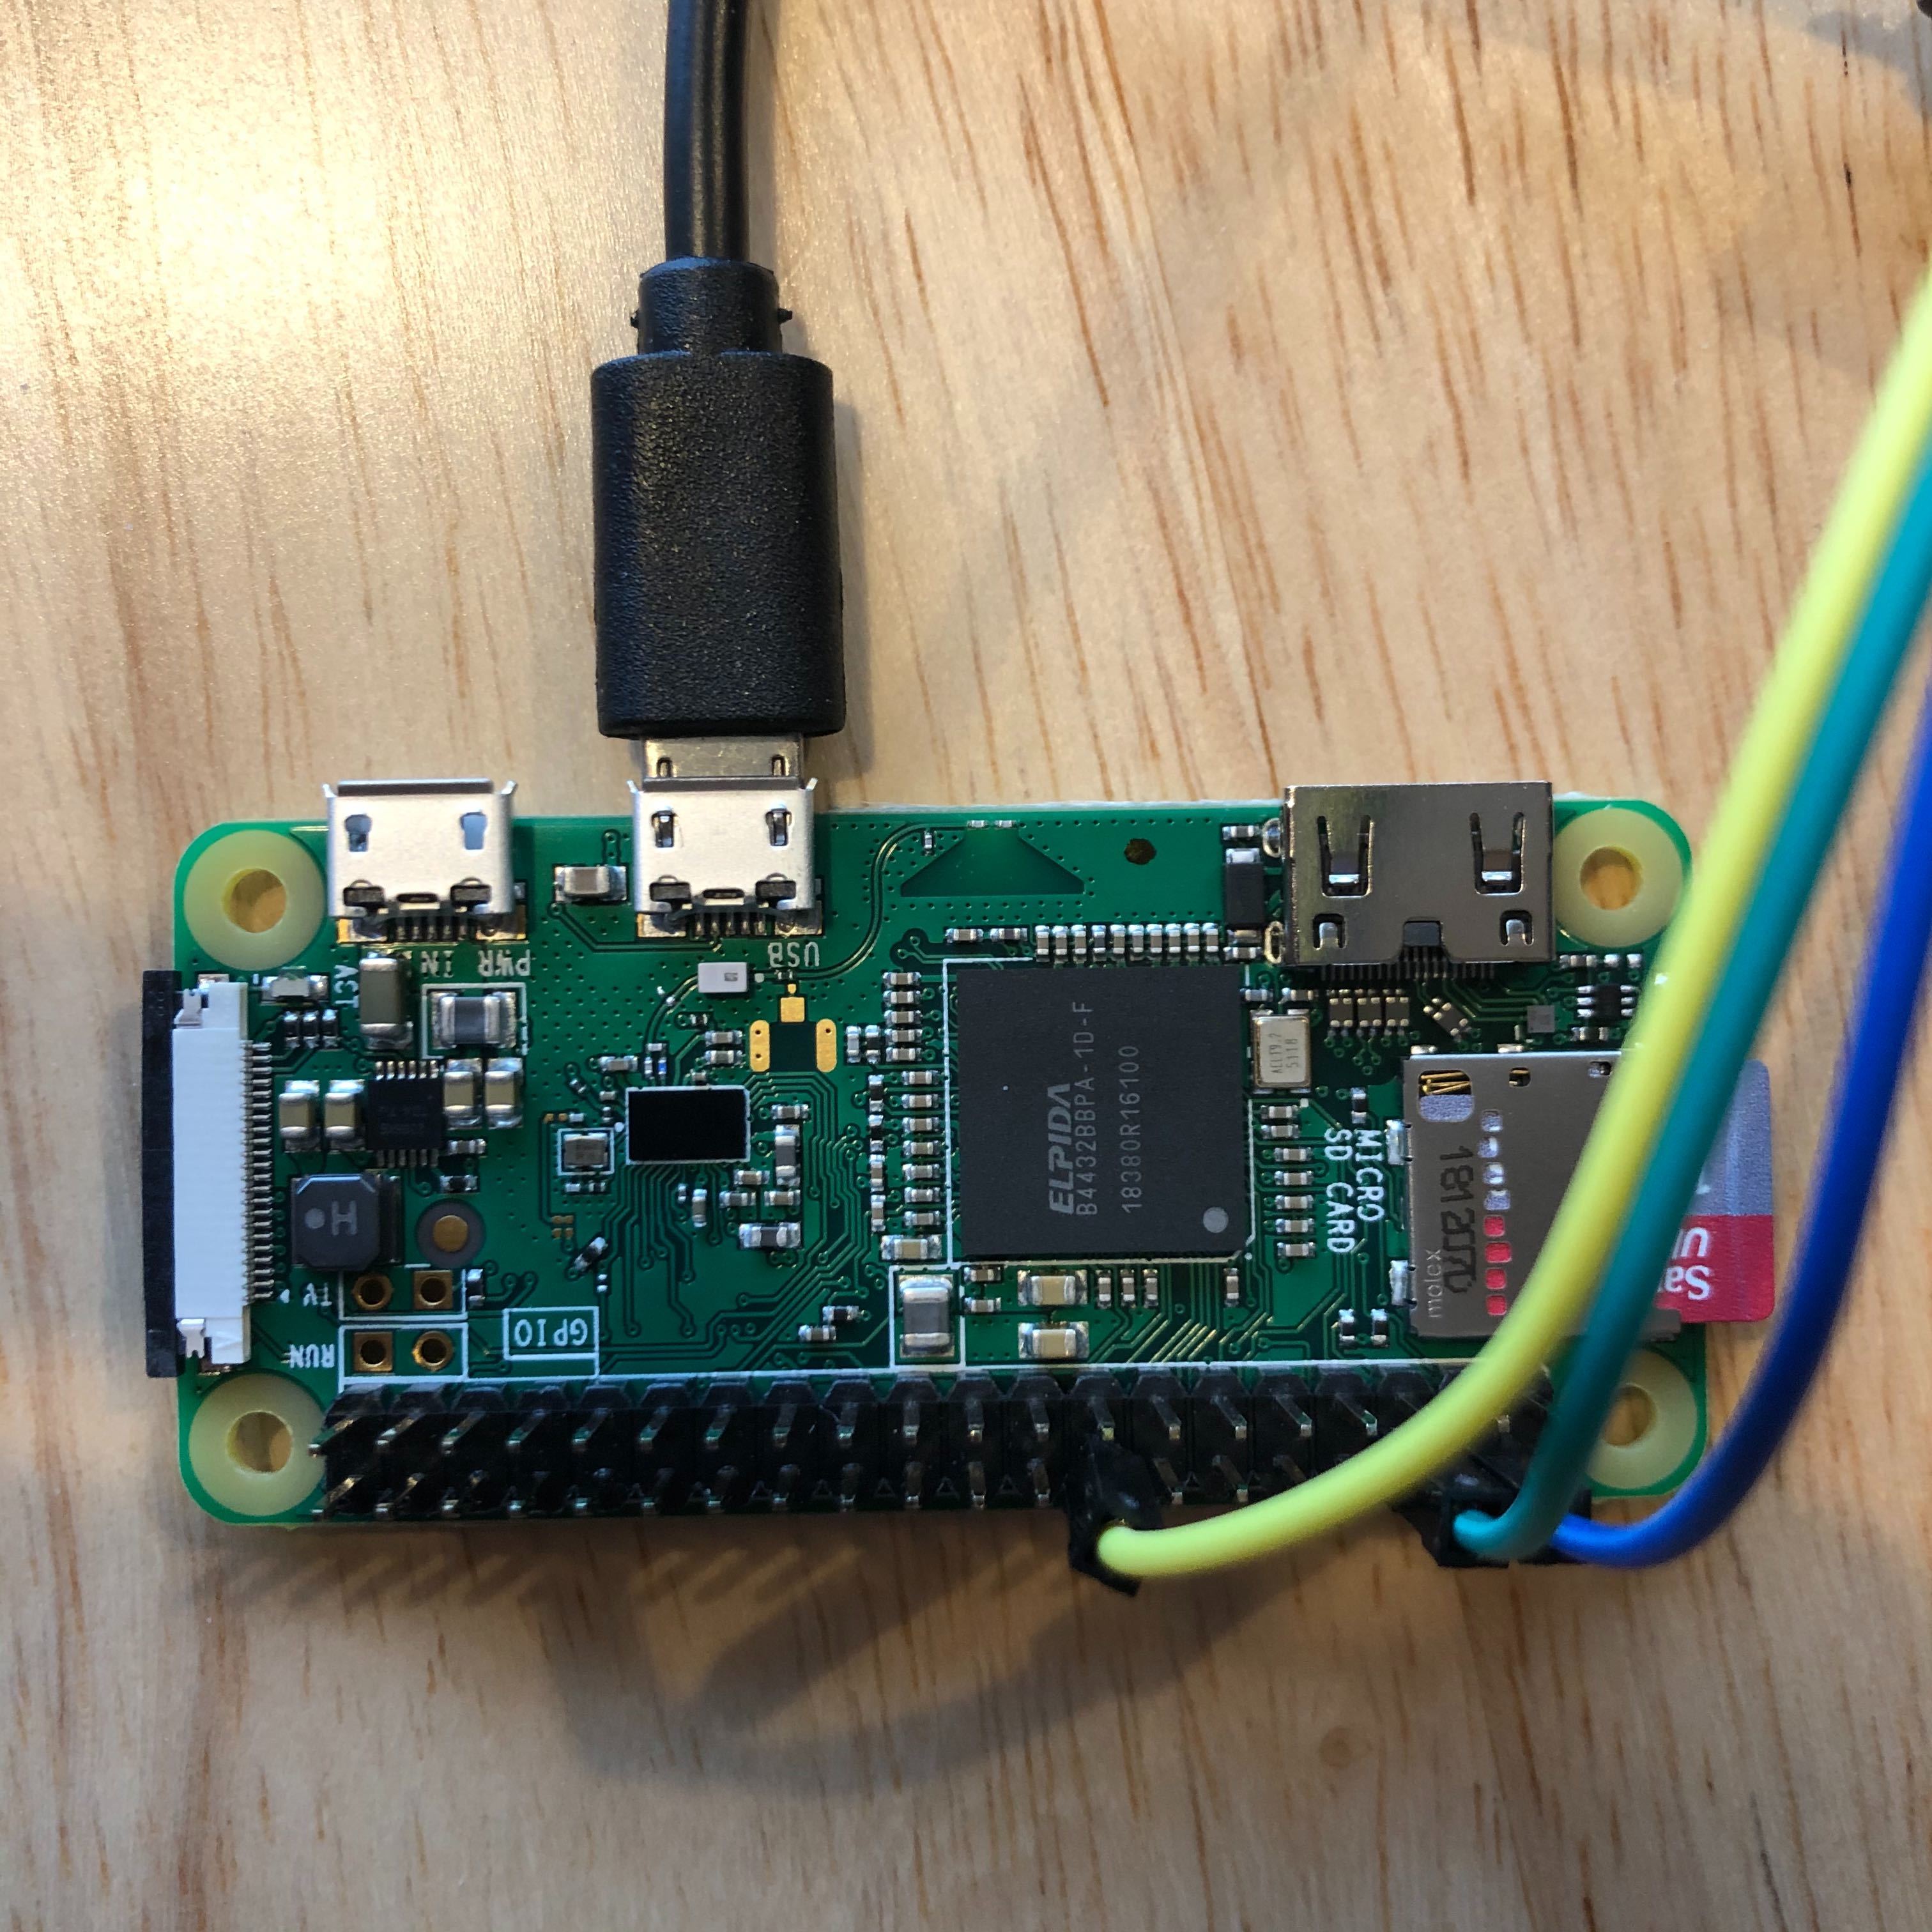
Connect a micro usb cable with the Raspberry Pi and then connect the other end of the cable to a computer.
Please ensure the micro usb cable is connected to the port which has usb etched into the printed circuit board, as shown in the diagram below:
To log in using ssh from a terminal, please run the ping command listed below, as
this will start to ping the Raspberry Pi which will generate the return responses:
ping raspberrypi.localExample output from pinging the Raspberry Pi:
Request timeout for icmp_seq 79
Request timeout for icmp_seq 80
Request timeout for icmp_seq 81
Request timeout for icmp_seq 82
Request timeout for icmp_seq 83
Request timeout for icmp_seq 84
64 bytes from raspberrypi.local: icmp_seq=85 ttl=64 time=0.952 ms
64 bytes from raspberrypi.local: icmp_seq=86 ttl=64 time=0.677 ms
Once the response is received, as can be seen in the last 2 lines above, then the following command can be executed:
ssh pi@raspberrypi.localIf prompted with a warning, press enter to accept the default, (Yes).
The prompt for a password should now appear, enter the password for the Raspberry Pi.
Your terminal should now be connected to the Raspberry Pi, so the preparation can be started as described below:
2.2.2 Create the tracking script
Execute the commands listed below in order to create the tracking script:
mkdir light_alarm #Create a folder to hold the tracking script.
cd light_alarm
npm init --yes #Creates the `package.json` file.
npm i @liskhq/lisk-transactions @liskhq/lisk-api-client @liskhq/lisk-cryptography rpi-pins #Install dependencies.
Now, create a new file called light-alarm.js.
touch light-alarm.jsNow copy the code from your local computer at transport/transactions/light-alarm.js (which was previously prepared in step 2.1) to the Raspberry Pi.
Open the file with the nano editor as shown below:
nano light-alarm.jsNow insert the code of the LightAlarmTransaction.
Use CMD+V to paste the contents in the file.
In order to save and exit nano, use the following keys:
CMD+O
ENTER
CMD+X
It is now necessary to create a second file for the actual tracking script, `index.js`as shown below:
touch index.jsNext, insert the code snippet as listed below ,and save the index.js file.
The above command can be reused with the nano editor.
const PIN = require("rpi-pins");
const GPIO = new PIN.GPIO();
// Rpi-pins uses the WiringPi pin numbering system (check https://pinout.xyz/pinout/pin16_gpio23).
GPIO.setPin(4, PIN.MODE.INPUT);
const LightAlarmTransaction = require('./light-alarm');
const { APIClient } = require('@liskhq/lisk-api-client');
const {getNetworkIdentifier} = require('@liskhq/lisk-cryptography');
const networkIdentifier = getNetworkIdentifier(
    "19074b69c97e6f6b86969bb62d4f15b888898b499777bda56a3a2ee642a7f20a",
    "Lisk",
);

// Replace `localhost` with the IP of the required node to reach for the API requests.
const api = new APIClient(['http://localhost:4000']);

const packetCredentials = { /* Insert the credentials of the packet here in step 1.3 */ }

// Check the status of the sensor in a certain interval, (here it is set to: 1 second).
setInterval(() => {
	let state = GPIO.read(4);
    if(state === 0) {
        console.log('Package has been opened! Send alarm transaction!');

        // Uncomment the below code in step 1.3 of the workshop
        /*
        api.accounts.get({address: packetCredentials.address}).then(response1 => {

        let tx =  new LightAlarmTransaction({
            asset: {
                timestamp: new Date().getTime() / 1000
            },
            fee: transactions.utils.convertLSKToBeddows('0.01'),
            nonce: response1.data[0].nonce
        });

        tx.sign(networkIdentifier, packetCredentials.passphrase);

        api.transactions.broadcast(tx.toJSON()).then(res => {
            console.log("++++++++++++++++ API Response +++++++++++++++++");
            console.log(res.data);
            console.log("++++++++++++++++ Transaction Payload +++++++++++++++++");
            console.log(tx.stringify());
            console.log("++++++++++++++++ End Script +++++++++++++++++");
        }).catch(err => {
            console.log(JSON.stringify(err.errors, null, 2));
        });
        */
    } else {
        console.log('Alles gut');
    }
}, 1000);
2.2.3 Run the tracking script
To check if the script can read the sensor data, start it by executing the following command below:
node index.jsFirstly, place the sensor in a dark area then move it into a light area, and verify that the correct logs are displayed in the console.
If no light has been detected, the following output will be displayed:
Alles gutHowever, if light has been detected, then the following output will be displayed:
Package has been opened! Send lisk transaction!The code will also try to send the LightAlarmTransaction in the case whereby light has been detected.
To cancel the script use the following keys:
CMD+C
Next in step 2.3, the client application will be used to initialize a new account for the packet.
2.3 The client application
Firstly a passphrase of the packet has to be stored on the Raspberry Pi, so it can sign and broadcast the LightAlarmTransaction.
Once this is completed, the client application can then be started in order to explore the sent transactions.
While the Raspberry Pi is still connected, open a local terminal window and navigate into the client app.
|
The complete implementation of the client is prepared before the workshop.
In this part 2 of the workshop, only the |
2.3.1 Installation
Start the client application by executing the following commands:
cd ../client
npm i
node app.js
Ensure the blockchain is running in order for the client to work.
If not, start the blockchain by navigating to the node/ folder and executing the following command:
node index.js | npx bunyan -o short2.3.2 Create new package credentials
Navigate to the Initialize page (web app running at http://localhost:3000), to create a new packet account.
Every time the page is refreshed, new packet credentials are created and initialized on the network.
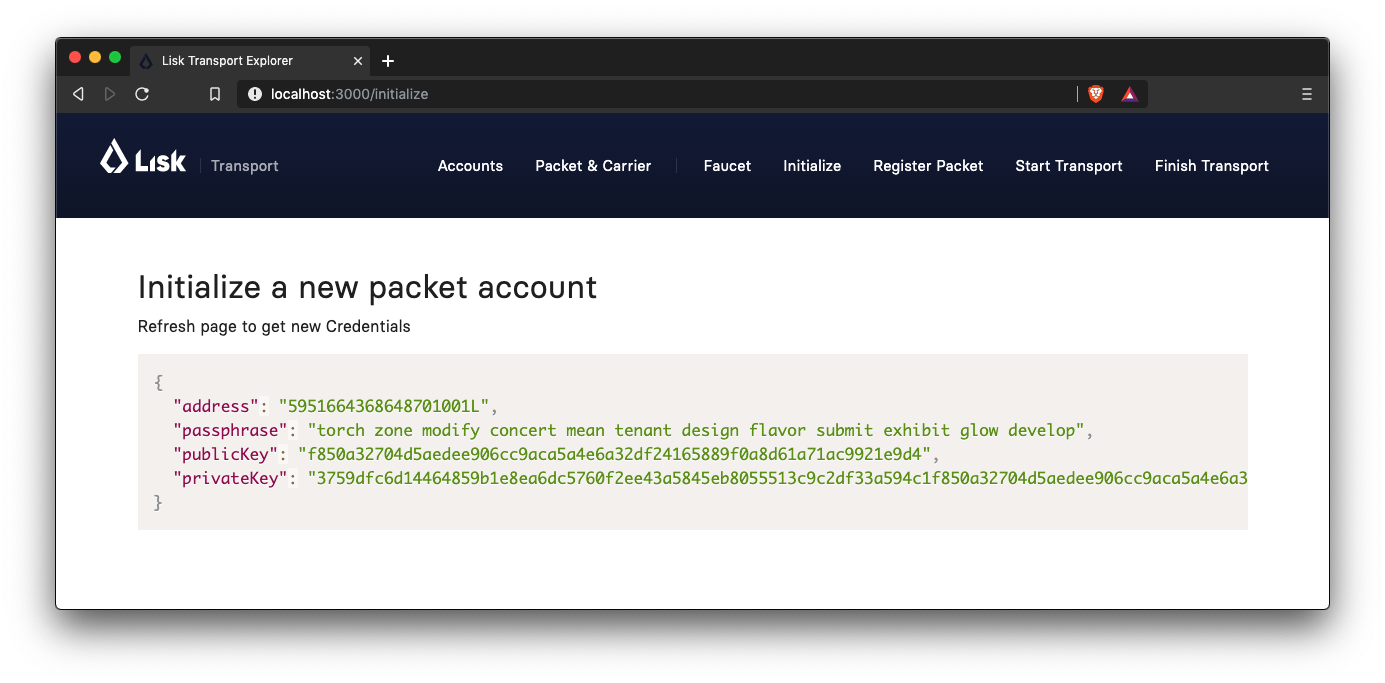
Copy the object with the credentials and paste it as packetCredentials in your tracking script on the Raspberry Pi.
It has to be pasted in the index.js file on the Raspberry Pi at the following line of code shown below:
const packetCredentials = { /* Insert the credentials of the packet here in step 1.3 */ }2.3.3 Update IP for node API
Exchange the localhost with the IP where your node application is running.
If the tutorial has been followed correctly, the node should run on your local machine.
To acquire the IP address, open a new terminal window on your machine and type the following: ifconfig or a similar command, that displays the current IP address.
Simply copy it and replace the localhost in the tracking script as shown below:
const api = new APIClient(['http://localhost:4000']);It should now be possible to check all elements.
2.3.4 Uncomment code that sends the light alarm transaction
Now uncomment the code snippet that creates and sends the light alarm transaction object.
2.3.5 Validate all components
To track the light alarm with the client application, follow the steps below:
-
How to ensure the blockchain node is running on your machine, (
node/folder):node index.js | npx bunyan -o short -
How to ensure the client from the
client/folder is running:node app.js -
Put the sensor of your Raspberry Pi in a dark area.
-
How to start the tracking script on your Raspberry Pi:
node index.js -
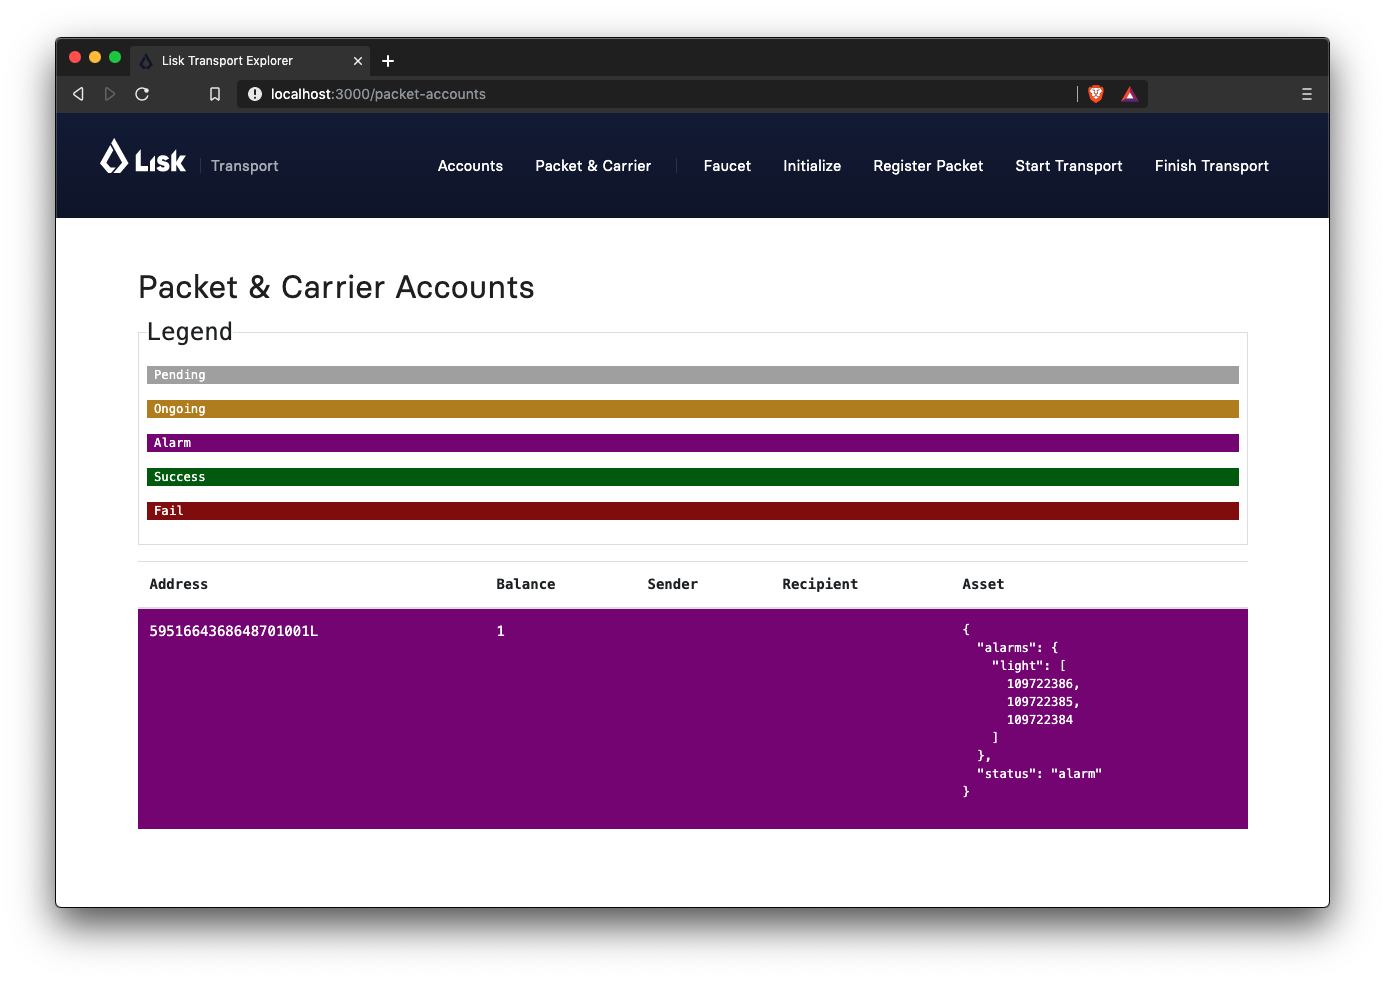
Go to the
Packet&Carrierpage in the client which is running at localhost:3000 and refresh the page. At this point nothing should be visible on the page yet. -
Now expose the sensor to some light, and refresh the page again.
-
Perform an additional refresh again, and a list of timestamps should be visible indicating which
LightAlarmTransactionshave been sent by the Raspberry Pi.
If timestamps are visible and have been added to asset.alarms.light of the packet account, then part 2 of the workshop has succesfully been completed! \o/
Now it is possible to detect a packet manipulation, and save the corresponding timestamp on the blockchain.