Part 4: How to publish the application
In part 4, the next steps required after the initial development of the application are covered here.
1. Make it portable
Currently the packet is not actually portable, as it requires a power source which is established by a USB connection to the computer.
Firstly, to ensure portability can be achieved an independent power source is required, such as a battery that can provide the Raspberry Pi with adequate power to enable the packet to be tracked.
Secondly, it is necessary for the tracking script to be automatically enabled after the Raspberry Pi boot process has been executed.
This can easily be achieved on the Raspberry Pi by installing pm2 globally using the following commands listed below:
npm install pm2 -g
pm2 startup
This should print the applicable command in the terminal window.
Copy and paste it in the terminal again to complete the setup of the pm2 startup script.
Start the tracking script with pm2.
light_alarm folder on the Raspberry Pi as shown below:pm2 start --name lightAlarm index.jspm2 saveAfter this has been performed, log out from the Raspberry Pi, disconnect it from the computer and connect it to an external portable power source. After the boot process has finished (approximately 1-2 minutes), then the tracking script will start running, which in turn will check the light sensor every second.
2. Connect more nodes
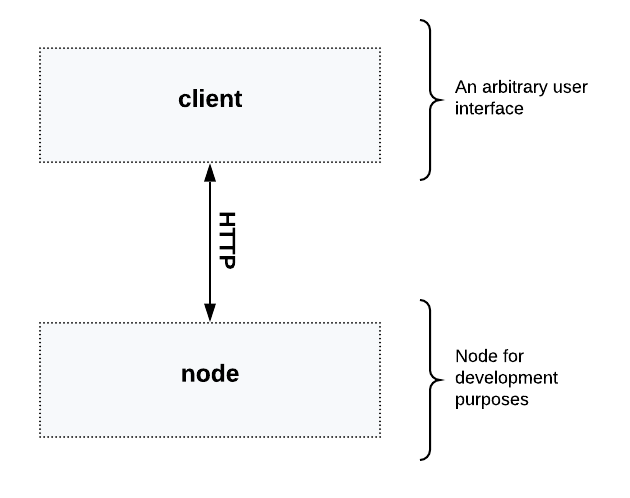
During development it is both necessary and convenient to have a rather centralized network with only one node connected.
Once the development has reached the point of concept or a usable product stage, it will be necessary to add more nodes to the network, and hence offer other potential users the opportunity to join the newly created blockchain network.
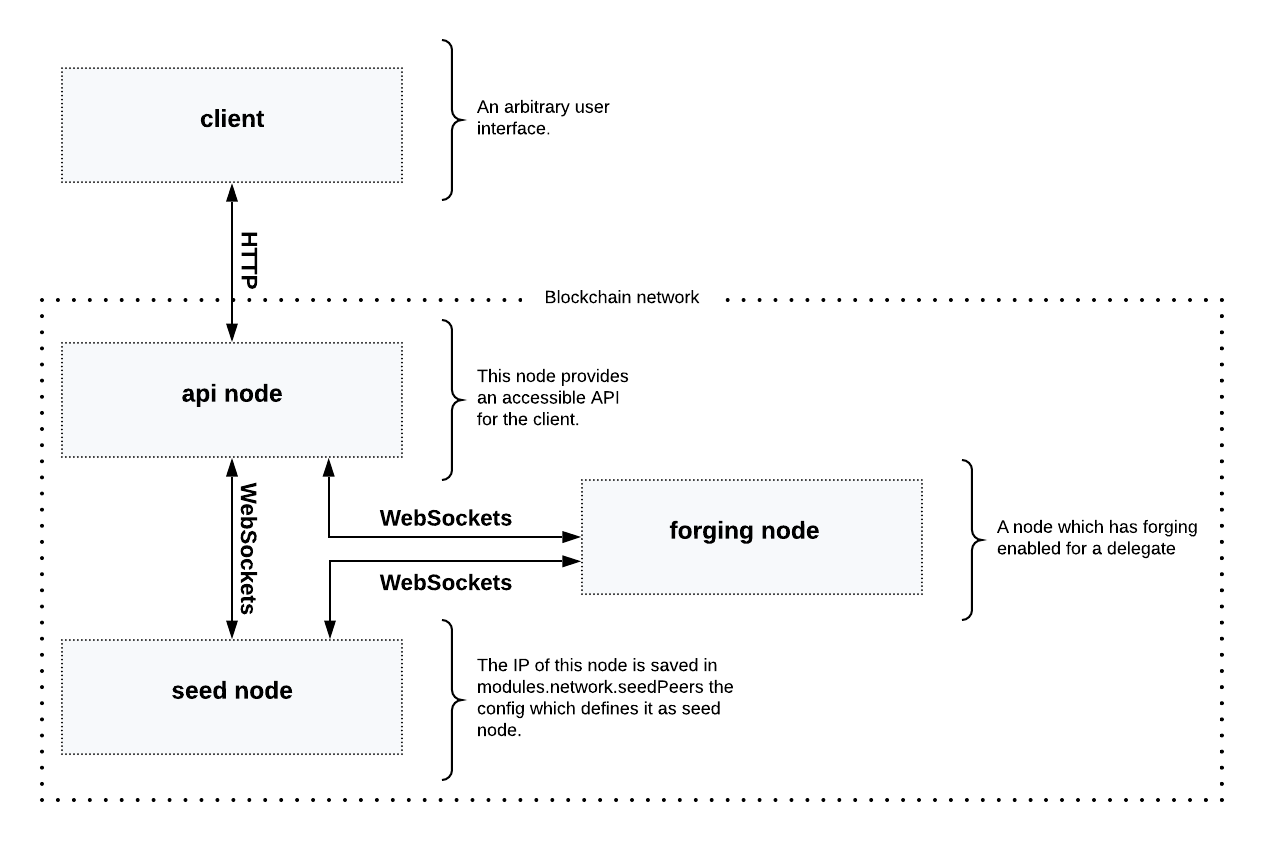
After completion of part 4, the set up should appear as shown below in the following diagram: Part 3: A simple supply chain tracking system.
The next step is to add one more node to the network that communicates between the seed node, the IoT and the client application as shown in the next diagram below:
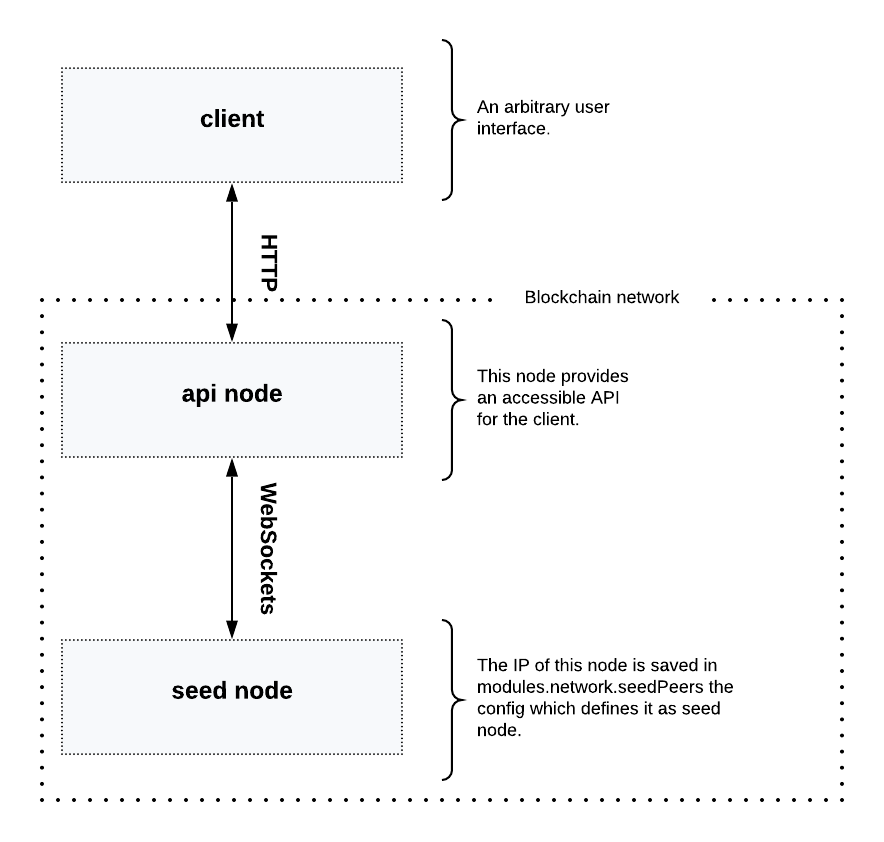
2.1. Set up an additional seed node
When setting up a new node, each new node will firstly connect to the seed nodes when booting for the first time. Starting from the seed node, a new node will discover the rest of the network by requesting their peer list. This is followed by the peer lists of the newly discovered peers and so on.
The seed node is a node that is specified in the config of the node application under modules.network.seedPeers and this should remain connected to the network.
Furthermore, it is also convenient to have the genesis delegates actively forging on the seed node, in case the network does not yet have enough real delegates who can take the forging spots.
The exposed configDevnet object is a good template for the config of a seed node, as it already includes the credentials from all of the 101 genesis delegates, and automatically enables forging for all of them.
|
2.2. Create a new config suited for the node application
Exchange the configDevnet object that was passed to the node during the development with the customized version.
|
It is recommended to create a config object with all the options that are different to the default config options.
To check the default config options, go to the configuration page or check it directly in the code listed below: |
Most of the configurations can stay the same as defined in the default config options. However, please note that there is one option that should be updated: The seed node(s).
So to add 1.2.3.4 as a seed node, add an object (or several objects), with the 2 properties ip and wsPort to the seedPeers list as displayed below:
const app = new Application(genesisBlockDevnet, {
    modules: {
        network: {
            seedPeers: [{ ip: '1.2.3.4', wsPort: 5000}]
        }
    }
});|
By default, the forging delegates list is empty. For example, for a proof of concept, in order to provide the already activated forging delegates inside the config; please use the devnet genesis delegates in configDevnet or create your own genesis delegates and add them to the config. |
2.3. Publish the application
Add the code for the customized node application (including the custom transactions), to a public code repository.
For example, on Github or Gitlab.
This provides everyone the opportunity to download the application and deploy it on a server in order to connect with the network.
The code should include at least the following files listed below:
-
index.js : The code that initializes and starts the node application.
-
package.json: A project file that lists all needed dependencies, (this should include
lisk-sdkas a dependency). -
transactions/: A folder containing all required custom transactions.
-
README: A Readme file which describes the most important steps to setup the node.
2.4. Connect nodes and verify
Add a second node to the network.
This new node will not have any forging activated, it is only required to talk via the API with the client application, and over the websocket connection to the seed node.
Therefore, at present the seed node is the only node at this point that can forge new blocks.
This is due to the fact that all the genesis delegates are actively forging on it.
| How to replace the genesis delegates with real delegates is covered in the next section Replace genesis delegates with real ones. |
To set up the node, install the node application on a new server. Just follow the instructions of the README, that was created in the previous step.
| Do not forget to open the corresponding ports for HTTP and WS communication! |
Once a new node is set up, update the API endpoint in the client application to target the new node as shown below:
// Constants
const API_BASEURL = 'http://134.209.234.204:4000'; (1)| 1 | Add the correct IP and port to the newly added node. |
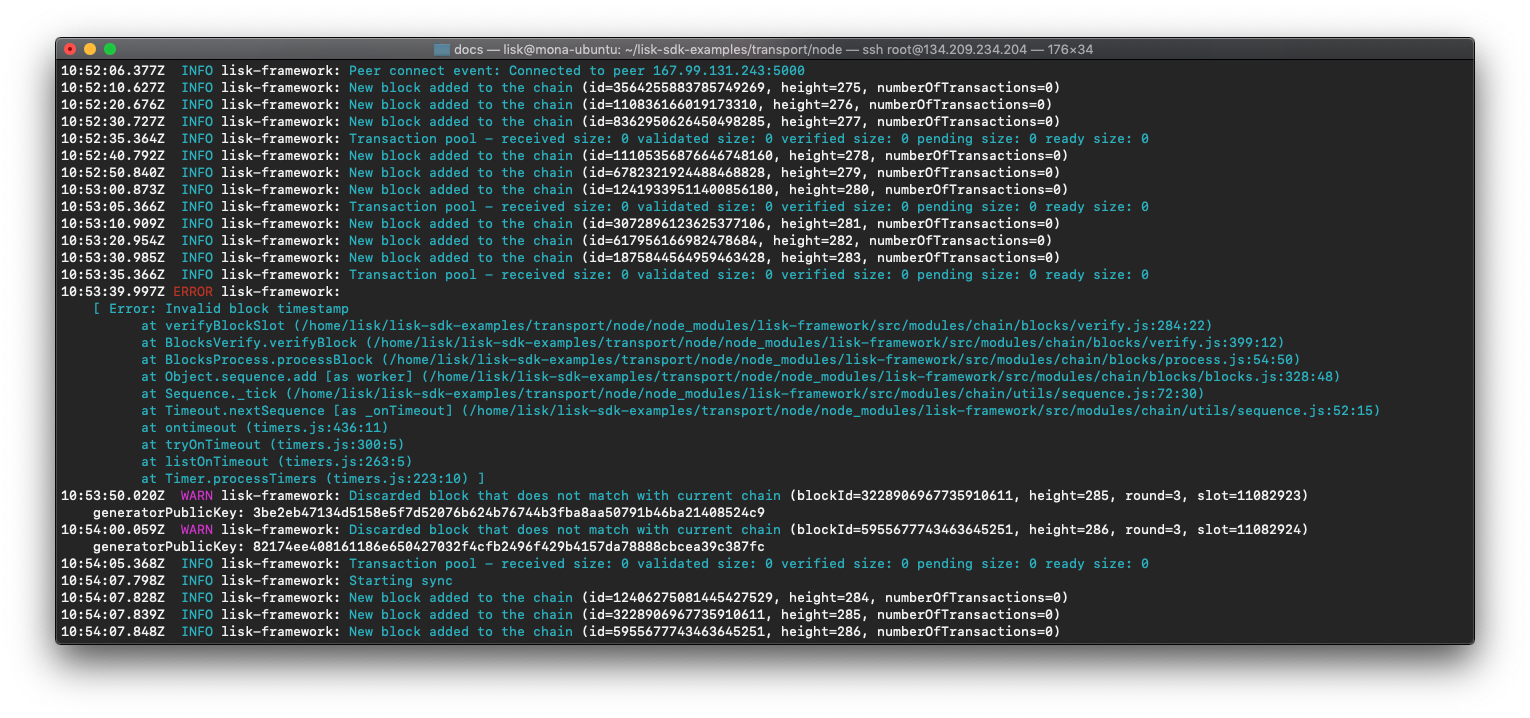
If the client application has the API endpoint of the new node, it will receive transactions from the client.
The transactions will be visible in the logs, (if the log level is at least info).
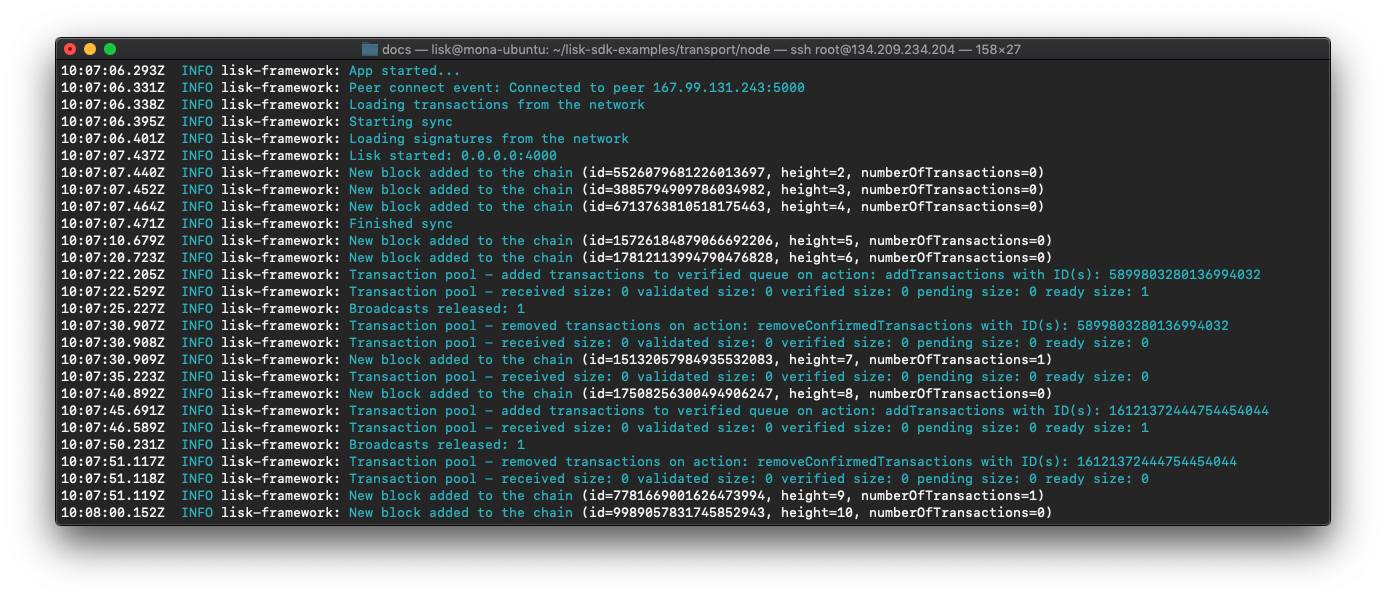
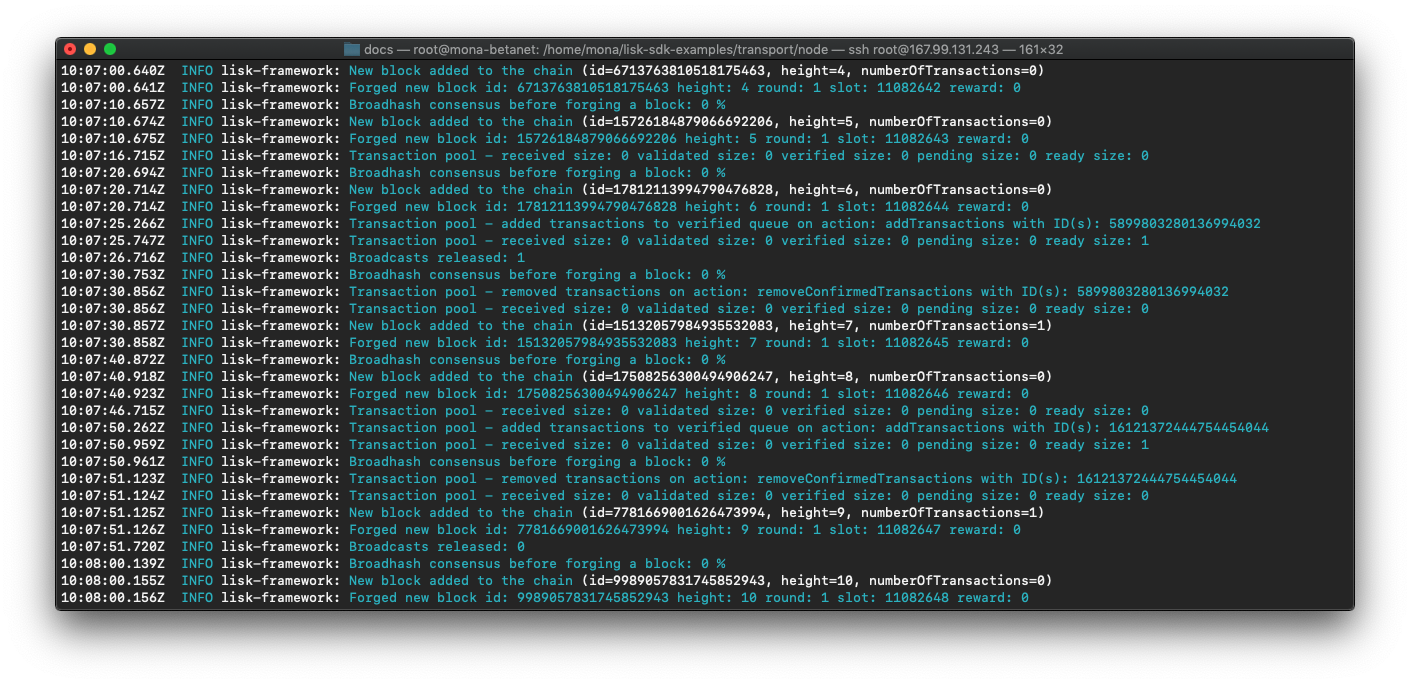
In the logs shown above it can be seen that the seed node was already 3 blocks ahead when the second node was started. It first synchronizes the missing blocks up to the current height and then broadcasts the received transactions from the client app to the seed node, whereby the delegates can then add the transactions to blocks and forge them.
These new blocks are broadcast again to the new node, and the client application can display the data based on the API calls that it sends to the new node.
|
Please be aware that broadcast errors can occur.
Sometimes errors occur when broadcasting transactions between the nodes. There is no cause for concern here, as the node will re-start the sync process again; and in the majority of cases it is successful on the next attempt.
In the above image the block at height 284 is not accepted because of an invalid block timestamp. As a result, the following blocks are also discarded by the node. Anomalies like this can occur within the network. The node can usually resolve these issues on its own by starting a new sync process, whereby it requests the missing blocks from one of its peer nodes. As shown in the logs above, the blocks at height 284, 285 and 286 are displayed as discarded.
At this point the node realizes it is not in sync with the other nodes, and therefore starts the sync process.
This can also be seen in the above logs, |
3. Replace genesis delegates with real ones
During development of the Lisk Transport application, one node was enabled for forging for all 101 genesis delegates.
After the release of the first version of the blockchain application, it is necessary that real delegates take the forging slots of the genesis delegates. The network will become stable and decentralized for the first time when at least 51 real delegates are actively forging in the network.
To join the network as a new delegate, follow the steps listed below:
-
Create your own private account on the network.
-
Send some funds (at least enough to register as a delegate), to the newly generated address in order to to initialize your account in the network.
-
Register a delegate.
-
Broadcast the delegate registration to the network as shown below:
export SECRET_PASSPHRASE=123456 (1)
lisk transaction:create:delegate lightcurve -p=env:SECRET_PASSPHRASE | tee >(curl -X POST -H "Content-Type: application/json" -d @- 1.2.3.4:4000/api/transactions) (2)
1 Replace 123456with the secret passphrase.2 Replace 1.2.3.4with the IP of a node with a public API.
-
Set up a node: Follow the steps in the
READMEfile of the application, (alternatively read the Lisk tutorials, as this process is basically identical). -
People become convinced to vote for a delegate in the network, if the delegate has the following attributes:
-
Is helpful.
-
Is accountable.
-
Is sharing rewards.
-
Is offering useful services or tools.
-
|
How to replace a genesis delegate If a delegate joins the network at a very early stage, they will probably replace one of the genesis delegates. The genesis delegates are voted in by the genesis account which holds all the tokens on the initial network start. The genesis account votes with these tokens for the genesis delegates, in order to stabilize the network during the development. Therefore, when replacing a genesis delegate, the new delegate will need to convince the person who controls the genesis account of the network; which will be most likely the application developer. Later when the majority of the existing tokens are distributed among the different private accounts, the new delegate needs to gain the trust of the community in order to be voted into a forging position. |
4. Write tests for custom transactions
The more complex the logic inside the custom transactions, the more complicated it becomes to verify that the custom transaction logic is working as expected.
Therefore it is recommended to write unit tests, that verify the logic of the transaction type.
Especially for verifying the code of the undoAsset() function, it is convenient to write unit tests.
This is due to the fact that the code in the undoAsset function is only executed, if the node discovers itself on a fork with the main chain.
|
To be on a fork means that the node added some different blocks to the chain than its peers.
In order to sync again with the network, it has to remove the blocks that are different, and undo the transactions inside these blocks.
To undo the transaction, the |
To test if the transaction is undone correctly write a unit test as shown below:
const RegisterPacketTransaction = require('../register-packet');
const transactions = require('@liskhq/lisk-transactions');
const { when } = require('jest-when');

const dateToLiskEpochTimestamp = date => (
    Math.floor(new Date(date).getTime() / 1000) - Math.floor(new Date(Date.UTC(2016, 4, 24, 17, 0, 0, 0)).getTime() / 1000)
);

describe('RegisterPacket Transaction', () => {
    let storeStub;
    beforeEach(() => {
        storeStub = {
            account: {
                get: jest.fn(),
                set: jest.fn(),
            },
        };
    });

    test('it should undo the state for register packet correctly', async () => {
        // Arrange
        const senderId = 'senderXYZ';
        const asset = {
            security: transactions.utils.convertLSKToBeddows('10'),
            minTrust: 0,
            postage: transactions.utils.convertLSKToBeddows('10'),
            packetId: 'not important',
        };

        const mockedPacketAccount = {
            address: 'xyz123',
        };
        const mockedSenderAccount = {
            address: 'abc123',
            balance: '10000000000', // 100 LSK
        };

        when(storeStub.account.get)
            .calledWith(asset.packetId)
            .mockReturnValue(mockedPacketAccount);

        when(storeStub.account.get)
            .calledWith(senderId)
            .mockReturnValue(mockedSenderAccount);

        // Act
        const tx = new RegisterPacketTransaction({
            senderId,
            asset,
            recipientId: 'xyzL',
            timestamp: dateToLiskEpochTimestamp(new Date()),
        });
        tx.undoAsset(storeStub);

        // Assert
        expect(storeStub.account.set).toHaveBeenNthCalledWith(
            1,
            mockedPacketAccount.address,
            {
                address: mockedPacketAccount.address,
                balance: 0,
                asset: null,
            }
        );

        expect(storeStub.account.set).toHaveBeenNthCalledWith(
            2,
            mockedSenderAccount.address,
            {
                address: mockedSenderAccount.address,
                balance: new transactions.utils.BigNum(mockedSenderAccount.balance).add(
                    new transactions.utils.BigNum(asset.postage)
                ).toString()
            }
        );
    });
});- What else needs to be tested?
-
Is writing unit tests really enough to ensure the functionality of a custom transaction ?
Short answer: The unit tests are sufficient.
Explanation: You may wonder if it is required to write additional functional and integration tests. Be aware that the correct reading and writing of the data to the database is already part of the Lisk SDK software testing, and therefore it is not needed to test it again for your new custom transaction. Therefore unit tests are generally sufficient to test the functionality of a custom transaction.
5. Further improvements
Connect more sensors to secure the travel of the packet.
For example, implement a TemperatureAlarm or HumidityAlarm to the LightAlarm transaction type.
Alternatively, let the network know the current location of the packet by transmitting the GPS location in a certain time interval.